当サイトは、アフィリエイト広告を利用しています
Vagrantでさくっと仮想マシンを作ってSSHログインする


最近、仮想マシンを立てることが多いのだが、一つずつVirtualBoxで
作成していくのが面倒だと思っていた。
ちょっと調べてみるとVagrantというものがあり
Vagrantを使うと簡単に仮想マシンが構築できたので
方法をまとめておく。
環境
- Ubuntu 22.04.3 LTS
- 6.1.38_Ubuntur153438(Virtualbox)
※Virtualboxはインストールされている前提
Vagrantとは?
Vagrantは、Virtualboxなど仮想化ソフトをCUIで操作することができるツール
そのためVagrantだけでは使えない。
イメージとしてはVirtualboxで手で操作して作っていたのを Vagrantを使えばコマンドで操作できる感じ。
Vagrantのインストール
ubunntuのterminalで下記を実行すれば、インストールできる
wget -O- https://apt.releases.hashicorp.com/gpg | sudo gpg --dearmor -o /usr/share/keyrings/hashicorp-archive-keyring.gpgecho "deb [signed-by=/usr/share/keyrings/hashicorp-archive-keyring.gpg] https://apt.releases.hashicorp.com $(lsb_release -cs) main" | sudo tee /etc/apt/sources.list.d/hashicorp.listsudo apt update && sudo apt install vagrant
下記を参照
Vagrant Boxを探す
Vagrantでは手動で1からOSをインストールしていくのは大変なので
仮想マシンのテンプレート(Box)となるファイルを元に仮想マシンを
作ることができる。
※DockerでいうところのDockerイメージみないたもの
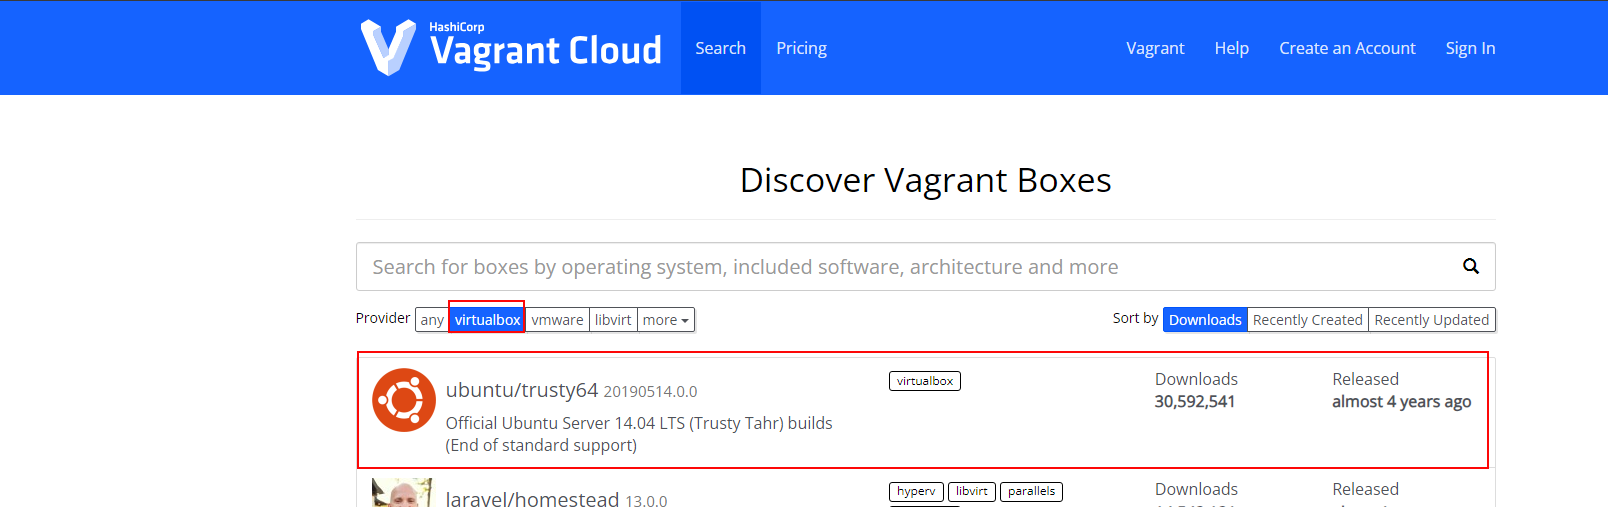
Boxは下記のサイトで検索できる
今回はDiscover Vagrant Boxesの
「ubuntu/trusty64 (virtualbox, 20190514.0.0)」をつかって仮想マシンを作るので
Boxをvagrantに追加しておく
vagrantboxで絞る
boxを追加する
$ vagrant box add ubuntu/trusty64
boxを確認する
$ vagrant box listubuntu/trusty64 (virtualbox, 20190514.0.0)
Vagrantを実行
VagrantではVagrantを実行したフォルダごとに1つの仮想マシンを作る。
そのため今回作成するubuntu/trusty64用のフォルダを作成する
$ mkdir vagrant_ubuntu$ cd vagrant_ubuntu
作成後に作成したフォルダに移動しておく
Vagrantfileを作る
Vagrantfileとは、仮想マシンの構築設定などを記述するためのファイルです。 boxを使ってVagrantfileを作る
$ vagrant init ubuntu/trusty64
実行すると直下にVagrantfileが作成される ※boxを使わずVagrantfileだけを作ることもできる
Vagrantfileを見てみる
細かい部分は省くが、指定したBoxが使われていることがわかる
~config.vm.box = "ubuntu/trusty64"~
Vagrantからvirtualboxで仮想マシンを起動する
準備ができたので仮想マシンをVagrantから立ち上げてみる
$ vagrant up --provider virtualbox
作成された仮想マシンを確認する
$ vagrant statusCurrent machine states:default running (virtualbox)The VM is running. To stop this VM, you can run `vagrant halt` toshut it down forcefully, or you can run `vagrant suspend` to simplysuspend the virtual machine. In either case, to restart it again,simply run `vagrant up`.
仮想マシンが起動していることがわかる
仮想マシンにsshでログインする
vagrantで立ち上げた仮想マシンにsshでログインしてみる
vagrantで立ち上げた仮想マシンには下記の二つの方法で
ログインすることができる
- vagrant sshを使う
- 通常のSSHクライアントを使う
それぞれ試してみる。 ※SSHクライアントがインストールされていない場合はエラーが発生する
vagrant ssh コマンドでVagrant仮想マシンにSSH接続する
vagrant_sshコマンドを打つだけ
$ vagrant sshvagrant@127.0.0.1's password:Welcome to Ubuntu 14.04.6 LTS (GNU/Linux 3.13.0-170-generic x86_64)* Documentation: https://help.ubuntu.com/System information as of Thu Sep 7 08:59:50 UTC 2023System load: 0.89 Processes: 86Usage of /: 3.6% of 39.34GB Users logged in: 0Memory usage: 29% IP address for eth0: 10.0.2.15Swap usage: 0%Graph this data and manage this system at:https://landscape.canonical.com/UA Infrastructure Extended Security Maintenance (ESM) is not enabled.0 updates can be installed immediately.0 of these updates are security updates.Enable UA Infrastructure ESM to receive 64 additional security updates.See https://ubuntu.com/advantage or run: sudo ua statusNew release '16.04.7 LTS' available.Run 'do-release-upgrade' to upgrade to it.vagrant@vagrant-ubuntu-trusty-64:~$
初期パスワードはvagrant
通常のSSHクライアントでVagrant仮想マシンへ接続する
次は通常のsshクライアントからログインしてみる。
接続情報を表示する
通常のsshで接続する場合は、接続情報を調べる
「vagrant ssh-config」で表示させる
$ vagrant ssh-configHost defaultHostName 127.0.0.1User vagrantPort 2222UserKnownHostsFile /dev/nullStrictHostKeyChecking noPasswordAuthentication noIdentityFile /home/ash92/vagrant_ubuntu/.vagrant/machines/default/virtualbox/private_keyIdentitiesOnly yesLogLevel FATAL
調べた情報を使ってログインする
$ ssh vagrant@127.0.0.1 -p 2222vagrant@127.0.0.1's password:Welcome to Ubuntu 14.04.6 LTS (GNU/Linux 3.13.0-170-generic x86_64)* Documentation: https://help.ubuntu.com/System information as of Thu Sep 7 09:07:42 UTC 2023System load: 0.0 Processes: 74Usage of /: 3.6% of 39.34GB Users logged in: 0Memory usage: 25% IP address for eth0: 10.0.2.15Swap usage: 0%Graph this data and manage this system at:https://landscape.canonical.com/UA Infrastructure Extended Security Maintenance (ESM) is not enabled.0 updates can be installed immediately.0 of these updates are security updates.Enable UA Infrastructure ESM to receive 64 additional security updates.See https://ubuntu.com/advantage or run: sudo ua statusNew release '16.04.7 LTS' available.Run 'do-release-upgrade' to upgrade to it.
これでvagrantで仮想マシンを作り、ログインすることができた。
vagrantのネットワークの設定方法か下記でまとめています
仮想マシンを削除する
最後に作った仮想マシンを止めて、削除しておく
削除すると仮想マシンで編集した設定などは初期化されるので注意
# 停止$ vagrant halt==> default: Attempting graceful shutdown of VM...# 削除$ vagrant destroydefault: Are you sure you want to destroy the 'default' VM? [y/N] y==> default: Destroying VM and associated drives...# 削除確認$ vagrant statusCurrent machine states:default not created (virtualbox)The environment has not yet been created. Run `vagrant up` tocreate the environment. If a machine is not created, only thedefault provider will be shown. So if a provider is not listed,then the machine is not created for that environment.
仮想マシンの起動状態の確認
「Vagrant-global-status」のプラグインを入れておくと便利です。


まとめ
vagrantを使えば、vagrantboxで作るよりも簡単に仮想マシンを
起動させることができるので今後はvagrantを使おうと思った。
vagrantではまだ色々できそうなので、調べたらまたまとめたい。


