当サイトは、アフィリエイト広告を利用しています
【Python】PythonからAnsibleを実行する方法


PythonのPythonAPIを使ってAnsibleを実行する方法を
Dockerコンテナでサンプルサーバーを作って試した見たので
その方法をまとめておく。
環境
- Windows10
- Docker version 24.0.2
- VScode
WindowsなのでDocker Desktop for Windowsを使う。
またPythonに関してはVScodeで実装する。
Docker Desktop for Windowsのインストール方法については
下記記事で解説しています


実行の構成
Dockerを使って二つのコンテナ
- controllnode:制御ノード
- targetnode:管理対象ノード
を作成し、controllnodeでPythonAPIを使い、Ansibleを実行して
targetnodeの設定を実行していく。
下記のようなイメージ
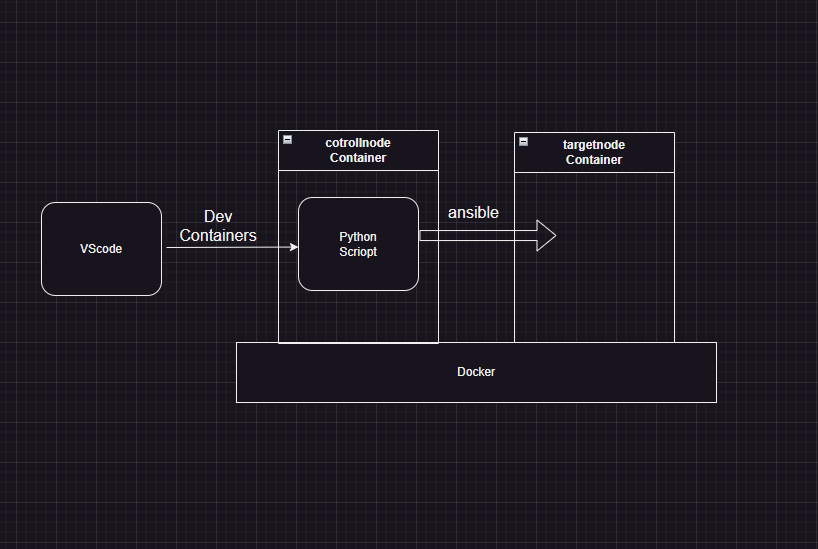
Python実装に関してはVScodeのDev Containerを使ってcontrollnode内で コンテナ開発する。
またAnsibleを実行する際、sshで接続する必要があるが
今回はパスワード認証を使って認証することにする。
プロジェクト構成
プロジェクトの構成は下記のようにする。
|-- app| |-- main.py| `-- main_readfile.py|-- docker| |-- CTnodeDockerfile| |-- TRnodeDockerfile| `-- requirements.txt|-- docker-compose.yml|-- inventory| `-- hosts.yml`-- project`-- playbook.yml
app
appディレクトリにはPythonスクリプトを格納する
詳しくは後で説明するが、下記の二つを格納しておく
- main.py
- main_readfile.py
docker
dockerfileを格納する。
今回はDockerコンテナを二つ作るので
- CTnodeDockerfile(制御ノード用)
- TRnodeDockerfile(管理対象ノード用)
の二つを格納する。
inventory
ansibleのイベントりを記述したイベントりファイルを格納する
project
ansibleのプレイブックを格納する
docker-compose.yml
docker-compose.ymlはプロジェクト直下に格納する。
2つDockerコンテナを作る
controllnodeとtargetnodeのコンテナを
docker-composeを使って作成していく。
controllnodeコンテイメージを作る
PythonからAnsibleを実行できる制御ノードとなるコンテナ
のコンテナイメージを作る。
# pythonイメージを取得FROM python:3.10.6# pipのインストールとアップデートRUN python -m pip install --upgrade pip# 編集用にvimをインストールRUN apt-get updateRUN apt-get -y install vim# sshのポートを20022に変更するRUN sed -ri 's/^# Port 22/ Port 20022/' /etc/ssh/ssh_config# 作業ディレクトリworkspaceへ移動WORKDIR /workspace# 作業ディレクトリworkspaceへrequirements.txtをコピーCOPY requirements.txt /workspace/# ライブラリのインストールRUN pip install -r requirements.txt# python実行時、パスワード認証をするためRUN apt-get install sshpass# ansible.cfgを作成RUN mkdir /etc/ansibleRUN touch /etc/ansible/ansible.cfg# ansible.cfgに追記# ansible実行時、OpenSSHのチェック機能による警告させないようにするRUN echo [ssh_connection] >> /etc/ansible/ansible.cfg \&& echo ssh_args = -o ControlMaster=auto -o ControlPersist=60s -o \StrictHostKeyChecking=no -o UserKnownHostsFile=/dev/null >> /etc/ansible/ansible.cfg# ホスト名ENV HOSTNAME controllnode
制御ノードの要件
制御ノードの要件としては
- Python 2 (バージョン 2.6 以降) または Python 3 (バージョン 3.5 以降)
とあるので、Dockerfileでインストールしておく
またPythonからAnsibleを実行するのに必要なライブラリを
requirements.txtに記述して読み込ませる
ansibleansible-base
ansible.cfgの作成
nsible.cfg(ansible設定ファイル)は、yum や apt-get などのパッケージ マネージャーを使用してインストールを実行した場合にのみ、
インストール中に自動的に作成される。
今回はpip を使用してansible をインストールしているので
構成ファイルを手動で作成する必要がある
ちなみにansible.cfgがない場合はデフォルト値が適用される。
ansible実行時、OpenSSHのチェック機能をoffにする
OpenSSHのチェック機能がonのままだとPythonからAnsibleを実行したときに
Using a SSH password instead of a key is not possible because Host Key checking is enabled and sshpass does not support this.Please add this host's fingerprint to your known_hosts file to manage this host.",
のエラーがでて実行されないのでoffにしておく
targetnodeコンテイメージを作る
管理対象ノードのコンテナのコンテナイメージを作成する
FROM rockylinux/rockylinux# PythonインストールRUN dnf install -y python39# systemctlを使える様にするRUN dnf -y update \&& dnf install -y openssh-server \openssh-clients \&& dnf clean all# パスワードを使用したログインを許可# ポートを22から20022に変更# rootのパスワードをpasswordに設定RUN sed -ri 's/^#PasswordAuthentication yes/PasswordAuthentication yes/' /etc/ssh/sshd_config \&& sed -ri 's/^#Port 22/Port 20022/' /etc/ssh/sshd_config \&& echo 'root:password' | chpasswdEXPOSE 20022# ホスト名ENV HOSTNAME targetnode
管理対象ノードの要件としては
- Python 2 (バージョン 2.6 以降) または Python 3 (バージョン 3.5 以降)
- SSH(SFTP OR SCP)
とあるので、Dockerfileでインストールしておく
docker-compose.ymlを作る
上記二つのこDockerコンテナを作成するdocker-compose.ymlを
作成する。
version: "3"# コンテナservices:# 制御ノードcontrollnode:container_name: controllnodebuild:context: ./docker #Dockerfileへのpathdockerfile: CTnodeDockerfiletty: truevolumes:- workspace:/workspaceports:- "1000:8888"networks:node_network:ipv4_address: 172.25.0.2# 管理対象ノードtargetnode:container_name: targetnode# image: rockylinux/rockylinuxbuild:context: ./docker #Dockerfileへのpathdockerfile: TRnodeDockerfilerestart: alwaystty: trueprivileged: truecommand: /sbin/initports:- 20022:20022networks:node_network:ipv4_address: 172.25.0.3# ネットワークnetworks:node_network:ipam:driver: defaultconfig:- subnet: 172.25.0.0/24# ボリュームvolumes:workspace:
- コンテナはDockerfileを元に作成する
- コンテナのIPアドレスを固定にする※変わると面倒なので
vscodeのdevcontainerでコンテナ開発環境を作る
次は作成した
- Dockerfile
- docker-compose.yml
をもとにVScodeでコンテナを作っていく。
VSCodeの前提条件
VSCode拡張機能の
- DevContainers
- Remote Development
のどちらかをインストールしておくこと。 使うはDevContainers ※Remote Developmentの中にDevContainersが含まれているため
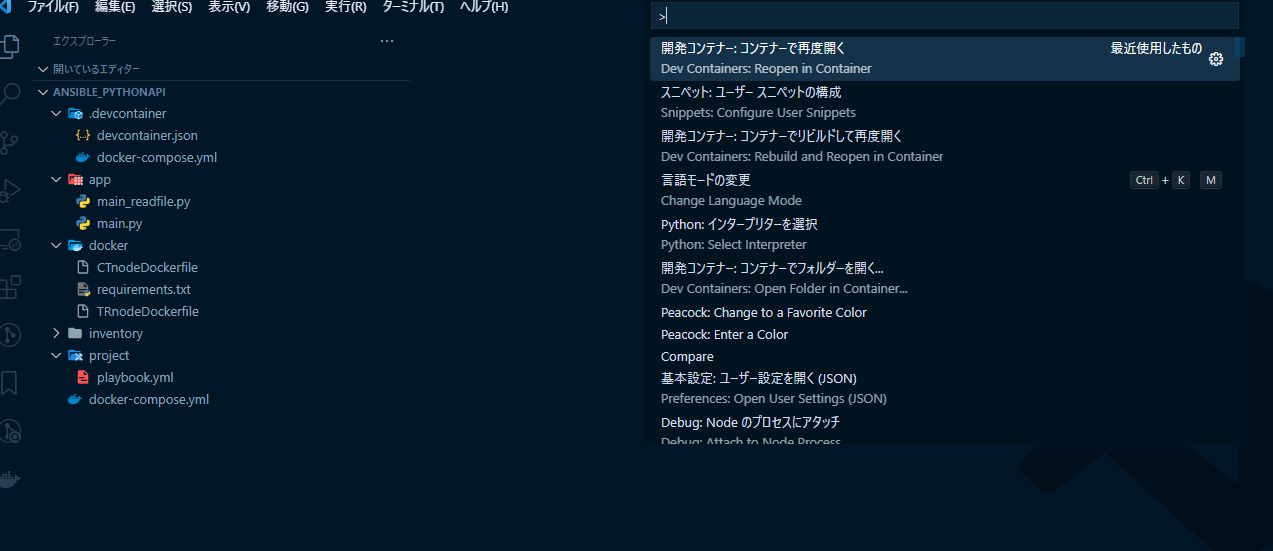
コンテナ開発画面を開く
コマンドパレット(F1 または ctrl + shift + P)を開き
「開発コンテナで再度開くを選択(Dev container:Reopen in Container)」
でコンテナ開発画面を開く
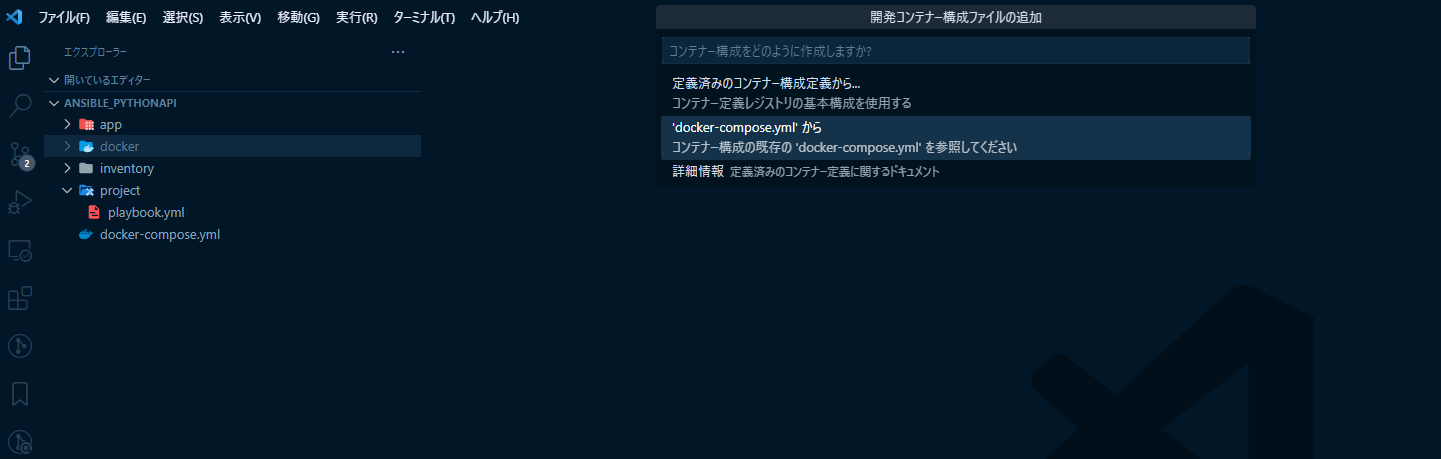
docker-compose.ymlからを選択
Pythonを実行するのはcontrollnodeなので
controllnodeを選択する
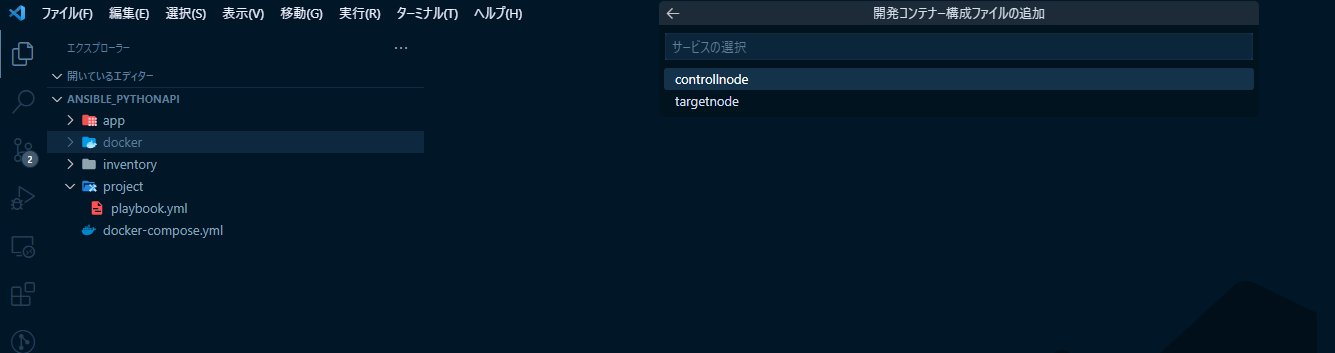
起動に成功するとコンテナが二つ作成される

PythonのVSCode拡張機能をインストールする
コンテナ開発環境は作成できたが、まだPythonが実行できないので
PythonのVSCode拡張機能をインストールする
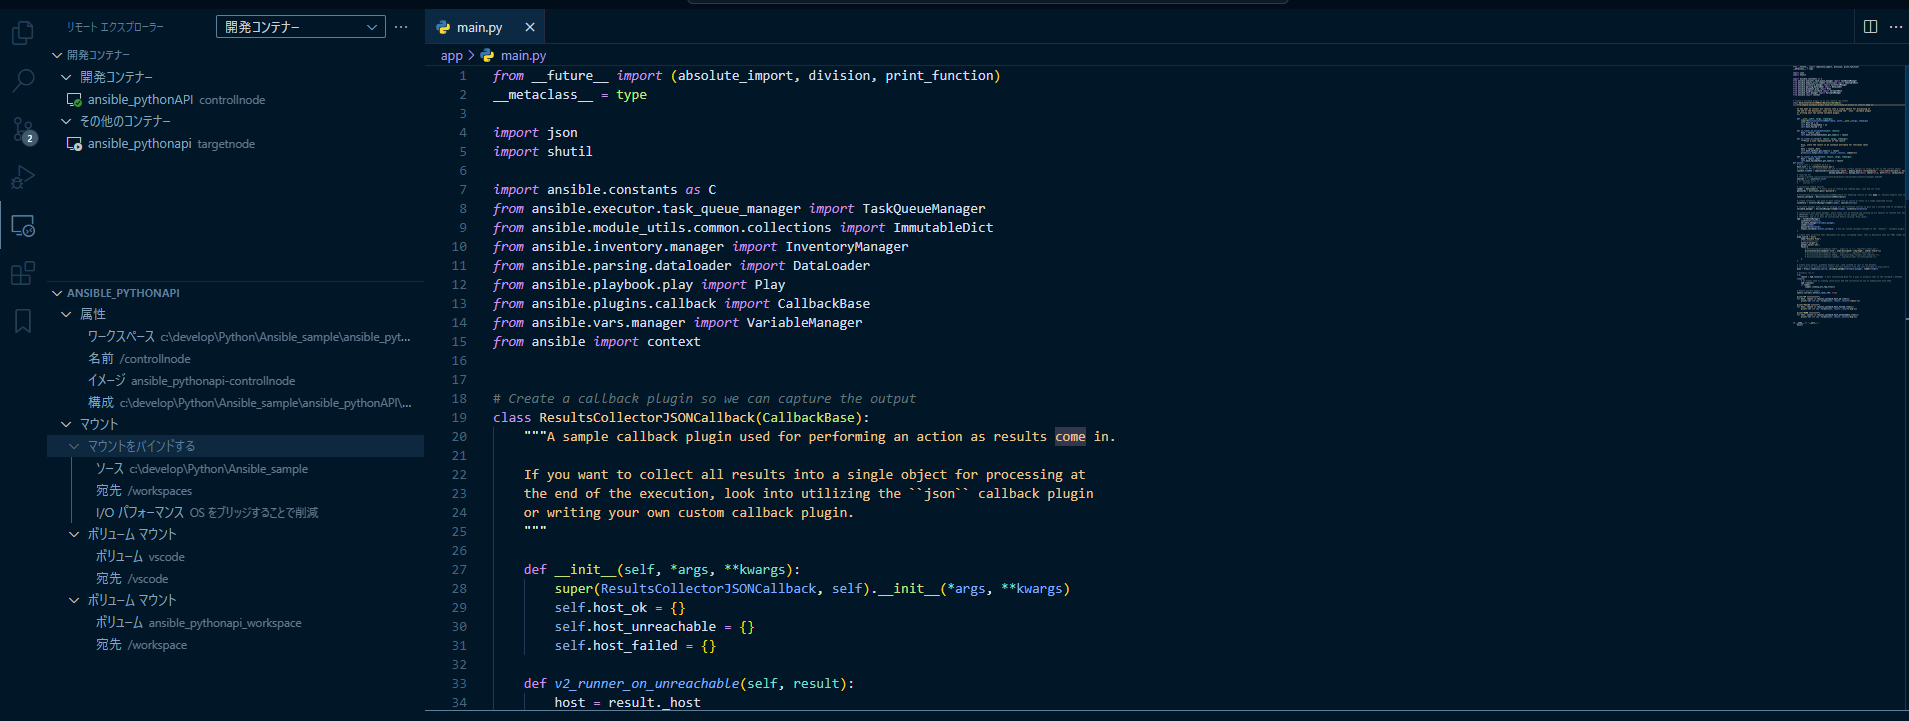
インストール前
右上にPython実行ボタンがないので実行できない
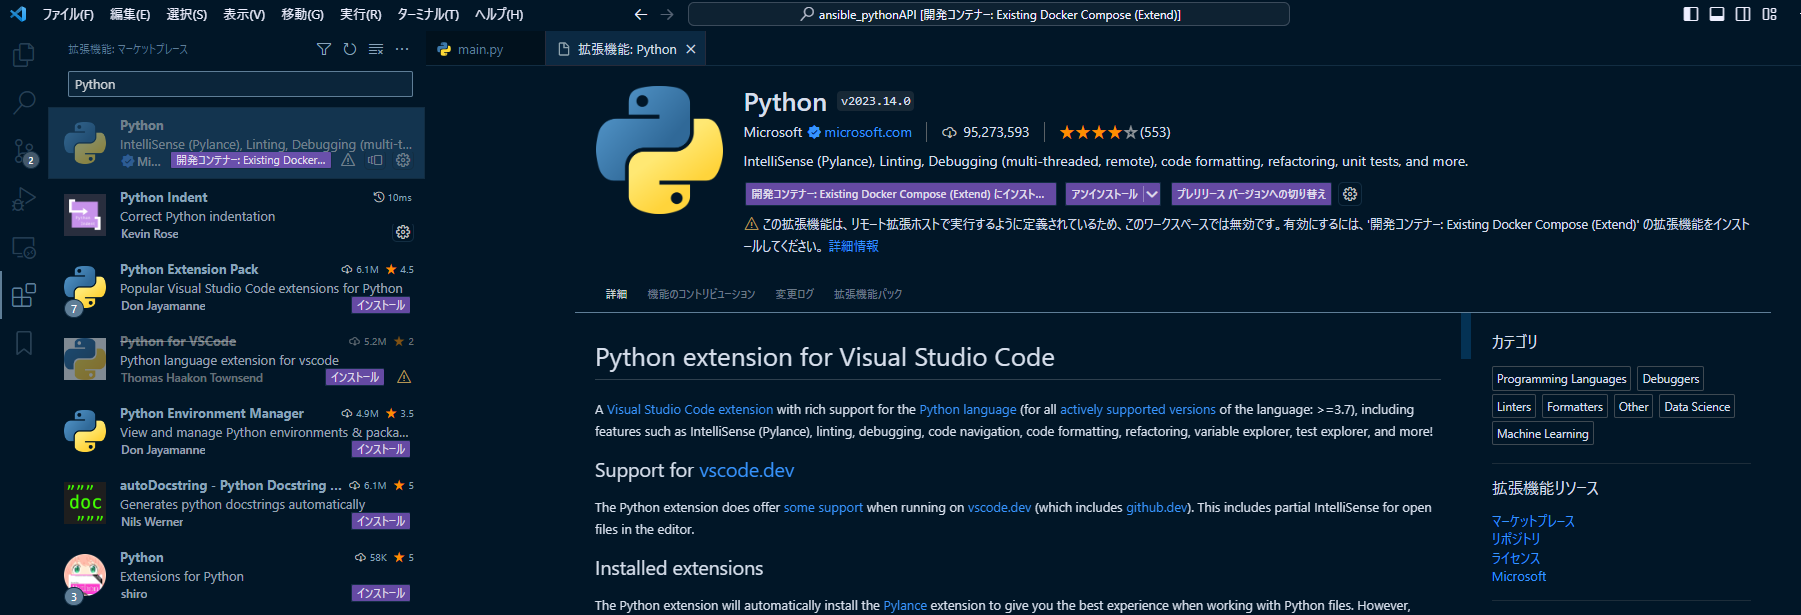
インストールする
コンテナにインストールする
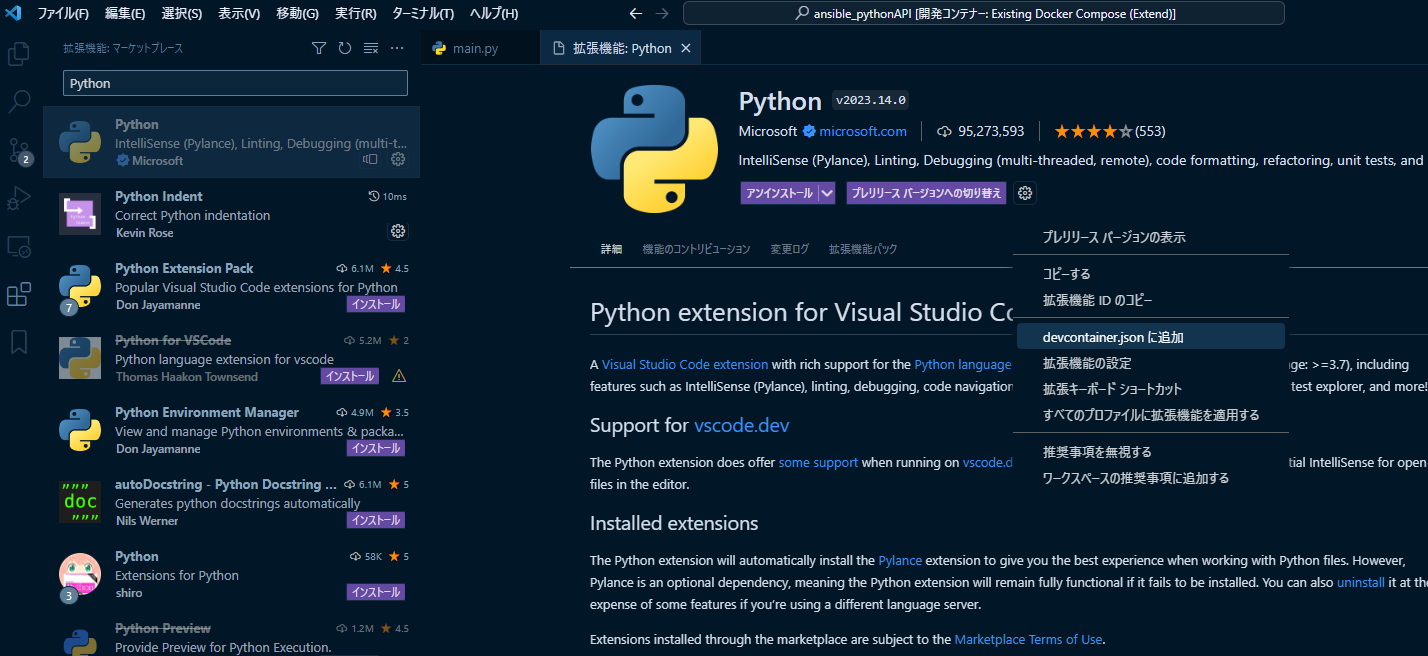
次からはコンテナ開発を起動したときに自動でインストールさせるように
設定しておく
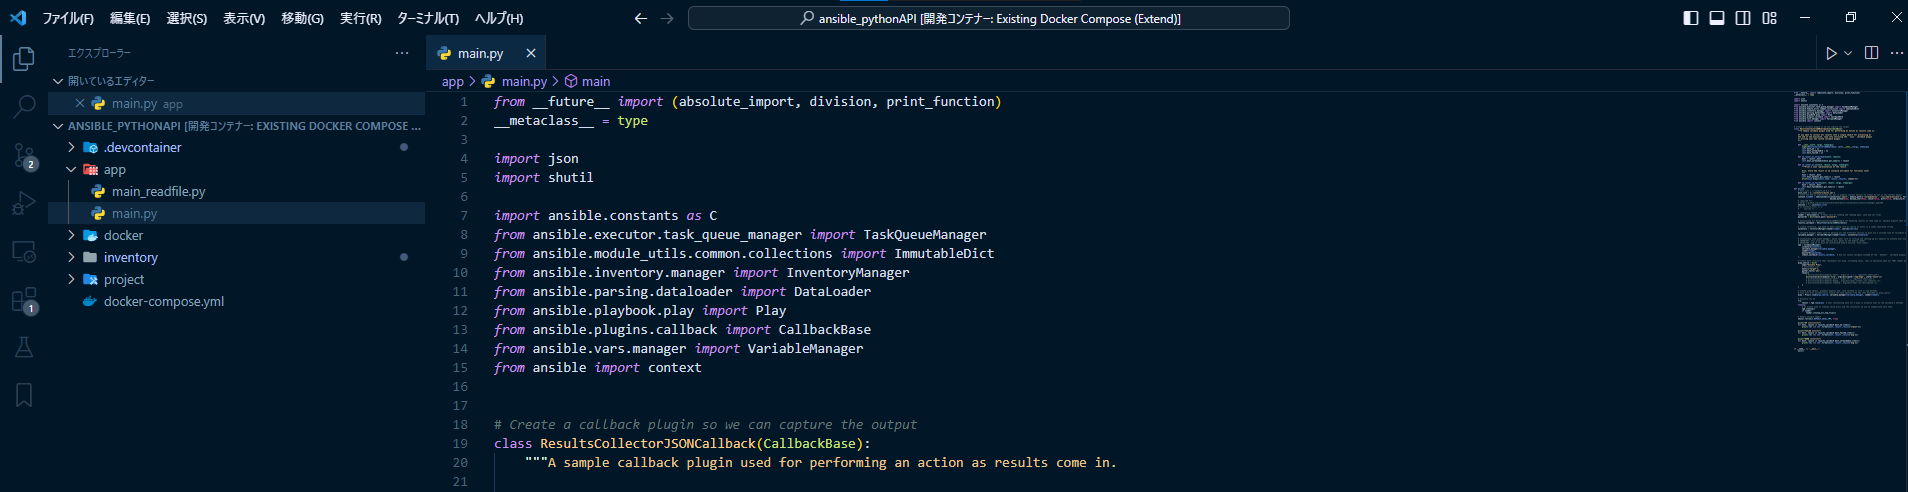
インストール後
右上に実行ボタンが顕現される!
AnsibleをPythonから実行する
VScodeでコンテナ開発環境ができたので
PythonからAnsibleを実行する。
Ansibleを実行には
- 対象のノードを指定
- 対象に対して何を行うかの設定
が必要になる。
Pythonから実行する場合、上記の二つをソースで指定またはファイル読み込みで
で設定できるので,対象に対して何を行うかの設定を
- ソースで指定
- ファイルで指定
するパターンで試してみる。
※対象のノードをコードで指定する方法はわからなかった...
ソースで指定するパターン
対象に対して何を行うかの設定をソース内で行うパターン
を試してみる
要はAnsibleのplaybookをソース内でコーディングするということ。
hosts.ymlを記述する
対象のノードを指定を行う
---all:hosts:target:ansible_host: 172.25.0.3ansible_user: rootansible_password: password
docker-compose.ymlとDockerfileで指定した管理対象ノードの
- IPアドレス
- ユーザー
- パスワード
を指定する。
main.py
プレイブックをソース内で記述している
from __future__ import (absolute_import, division, print_function)__metaclass__ = typeimport jsonimport shutilimport ansible.constants as Cfrom ansible.executor.task_queue_manager import TaskQueueManagerfrom ansible.module_utils.common.collections import ImmutableDictfrom ansible.inventory.manager import InventoryManagerfrom ansible.parsing.dataloader import DataLoaderfrom ansible.playbook.play import Playfrom ansible.plugins.callback import CallbackBasefrom ansible.vars.manager import VariableManagerfrom ansible import context# Create a callback plugin so we can capture the outputclass ResultsCollectorJSONCallback(CallbackBase):"""A sample callback plugin used for performing an action as results come in.If you want to collect all results into a single object for processing atthe end of the execution, look into utilizing the ``json`` callback pluginor writing your own custom callback plugin."""def __init__(self, *args, **kwargs):super(ResultsCollectorJSONCallback, self).__init__(*args, **kwargs)self.host_ok = {}self.host_unreachable = {}self.host_failed = {}def v2_runner_on_unreachable(self, result):host = result._hostself.host_unreachable[host.get_name()] = resultdef v2_runner_on_ok(self, result, *args, **kwargs):"""Print a json representation of the result.Also, store the result in an instance attribute for retrieval later"""# host = result._host# self.host_ok[host.get_name()] = result# print(json.dumps({host.name: result._result}, indent=4))host = result._hostself.host_ok[host.get_name()] = resultdef v2_runner_on_failed(self, result, *args, **kwargs):host = result._hostself.host_failed[host.get_name()] = resultdef main():# host_list = ['root@172.25.0.2']host_list = ['./inventory/hosts.yml']# since the API is constructed for CLI it expects certain options to always be set in the context objectcontext.CLIARGS = ImmutableDict(connection='smart', module_path=['/to/mymodules', '/usr/share/ansible'], forks=10, become=None,become_method=None, become_user=None, check=False, diff=False, verbosity=0)# required for# https://github.com/ansible/ansible/blob/devel/lib/ansible/inventory/manager.py#L204sources = ','.join(host_list)# if len(host_list) == 1:# sources += ','# initialize needed objectsloader = DataLoader() # Takes care of finding and reading yaml, json and ini filespasswords = dict(vault_pass='password')# Instantiate our ResultsCollectorJSONCallback for handling results as they come in. Ansible expects this to be one of its main display outletsresults_callback = ResultsCollectorJSONCallback()# create inventory, use path to host config file as source or hosts in a comma separated stringinventory = InventoryManager(loader=loader, sources=sources)# variable manager takes care of merging all the different sources to give you a unified view of variables available in each contextvariable_manager = VariableManager(loader=loader, inventory=inventory)# instantiate task queue manager, which takes care of forking and setting up all objects to iterate over host list and tasks# IMPORTANT: This also adds library dirs paths to the module loader# IMPORTANT: and so it must be initialized before calling `Play.load()`.tqm = TaskQueueManager(inventory=inventory,variable_manager=variable_manager,loader=loader,passwords=passwords,stdout_callback=results_callback, # Use our custom callback instead of the ``default`` callback plugin, which prints to stdout)# create data structure that represents our play, including tasks, this is basically what our YAML loader does internally.play_source = dict(name="Ansible Play",# hosts=host_list,hosts=['target'],# gather_facts='yes',tasks=[# dict(action=dict(module='shell', args='ls -l /'), register='shell_out')dict(action=dict(module='file', args=dict(path='/tmp/hoge', state='touch')))# dict(action=dict(module='shell', args='ls'), register='shell_out'),# dict(action=dict(module='debug', args=dict(msg='{{shell_out.stdout}}'))),# dict(action=dict(module='command', args=dict(cmd='/usr/bin/uptime'))),])# Create play object, playbook objects use .load instead of init or new methods,# this will also automatically create the task objects from the info provided in play_sourceplay = Play().load(play_source, variable_manager=variable_manager, loader=loader)# Actually run ittry:result = tqm.run(play) # most interesting data for a play is actually sent to the callback's methodsfinally:# we always need to cleanup child procs and the structures we use to communicate with themtqm.cleanup()if loader:loader.cleanup_all_tmp_files()# Remove ansible tmpdirshutil.rmtree(C.DEFAULT_LOCAL_TMP, True)print("UP ***********")for host, result in results_callback.host_ok.items():# print('{0} >>> {1}'.format(host, result._result['stdout']))print(host)print(json.dumps(result._result, indent=4))print("FAILED *******")for host, result in results_callback.host_failed.items():print('{0} >>> {1}'.format(host, result._result['msg']))print("DOWN *********")for host, result in results_callback.host_unreachable.items():print('{0} >>> {1}'.format(host, result._result['msg']))if __name__ == '__main__':main()
下記を参考にしてます
playbookの内容
play_source = dict(name="Ansible Play",# hosts=host_list,hosts=['target'],gather_facts='yes',tasks=[# dict(action=dict(module='shell', args='ls -l /'), register='shell_out')dict(action=dict(module='file', args=dict(path='/tmp/hoge', state='touch')))# dict(action=dict(module='shell', args='ls'), register='shell_out'),# dict(action=dict(module='debug', args=dict(msg='{{shell_out.stdout}}'))),# dict(action=dict(module='command', args=dict(cmd='/usr/bin/uptime'))),])
targetnodeに「/tmp/hoge」を作成する
実行前確認
実行前のtargetnodeにログインして、「/tmp/hoge」がないことを確認する
targetnodeにログインする方法は
- docker execでログイン
- sshでログイン
のどちらかを使う。
docker execでログインする
docker execを使う場合はホストからログインする
VSCode上のコンテナ開発のターミナルはcontrollnode上で動いてるため
Dockerはインストールされていないのでログインできない。
ホスト(Windows10)でWindowsTerminalからログインする
※GitBashを使う
起動してるコンテナのNAMESまたはCONTAINER IDを確認する
$ docker psCONTAINER ID IMAGE COMMAND CREATED STATUS PORTS NAMES53c1c32650b0 ansible_pythonapi-targetnode "/sbin/init" About an hour ago Up About an hour 0.0.0.0:20022->20022/tcp targetnodeaa8d69cc13d0 ansible_pythonapi-controllnode "/bin/sh -c 'echo Co…" About an hour ago Up About an hour 0.0.0.0:1000->8888/tcp controllnode
docker execコマンドでログインして
ファイルがないことを確認する
$ docker exec -it targetnode bash[root@53c1c32650b0 /]#[root@53c1c32650b0 /]# cd /tmp[root@53c1c32650b0 tmp]# lsks-script-7srd58lj ks-script-lcrwq6wj[root@53c1c32650b0 tmp]#
sshでログインする
VSCode上から確認する場合は、controllnodeからtargetnodeへ
sshでログインする。
root@aa8d69cc13d0:/workspaces/ansible_pythonAPI# ssh root@172.25.0.3The authenticity of host '[172.25.0.3]:20022 ([172.25.0.3]:20022)' can't be established.ECDSA key fingerprint is SHA256:GWHoVbMXTeE3hDPJFCc9mPnNAXNDAreqGq41Cak8n+k.Are you sure you want to continue connecting (yes/no/[fingerprint])? yesWarning: Permanently added '[172.25.0.3]:20022' (ECDSA) to the list of known hosts.root@172.25.0.3's password:Last login: Wed Aug 30 18:37:48 2023 from 172.25.0.2[root@53c1c32650b0 ~]#
ファイルがないことを確認する
[root@53c1c32650b0 ~]# cd /tmp/hoge-bash: cd: /tmp/hoge: No such file or directory[root@53c1c32650b0 ~]#
main.pyを実行する
ファイルがないことを確認できたので
main.pyを実行する
※右上の実行ボタンを押す
root@aa8d69cc13d0:/workspaces/ansible_pythonAPI# /usr/local/bin/python /workspaces/ansible_pythonAPI/app/main.pyUP ***********target{"dest": "/tmp/hoge","changed": true,"diff": {"before": {"path": "/tmp/hoge","state": "absent","mtime": 1693422597.9600735,"atime": 1693422597.9600735},"after": {"path": "/tmp/hoge","state": "touch","mtime": 1693422597.9705737,"atime": 1693422597.9705737}},"uid": 0,"gid": 0,"owner": "root","group": "root","mode": "0644","state": "file","size": 0,"invocation": {"module_args": {"path": "/tmp/hoge","state": "touch","recurse": false,"force": false,"follow": true,"modification_time_format": "%Y%m%d%H%M.%S","access_time_format": "%Y%m%d%H%M.%S","unsafe_writes": false,"_original_basename": null,"_diff_peek": null,"src": null,"modification_time": null,"access_time": null,"mode": null,"owner": null,"group": null,"seuser": null,"serole": null,"selevel": null,"setype": null,"attributes": null}},"_ansible_no_log": false}
Ansibleが実行されたので、targetnodeにログインして
ファイルができているか確認する。
$ docker exec -it targetnode bash[root@53c1c32650b0 /]# cd /tmp[root@53c1c32650b0 tmp]# lshoge ks-script-7srd58lj ks-script-lcrwq6wj
ファイルが作成されている
ファイルで指定するパターン
上記ではplaybookをソース内でコーディングしたが
今度はplaybookをファイルで読み込ませて実行してみる
hosts.ymlに関しては同じものを使用する。
playbook.yml
playbookをymlで作成する。
---- hosts: allgather_facts: notasks:- name: testyum: name=httpd state=latest
httpdをインストールするplaybookを作成
main_readfile.py
playbookを読み込む要のPythonプログラム
import osimport sysfrom collections import namedtupleimport jsonfrom ansible.parsing.dataloader import DataLoaderfrom ansible.vars.manager import VariableManagerfrom ansible.inventory.manager import InventoryManagerfrom ansible.executor.playbook_executor import PlaybookExecutorfrom ansible.module_utils.common.collections import ImmutableDictfrom ansible import contextfrom ansible.plugins.callback import CallbackBaseclass ResultCallback(CallbackBase):def __init__(self, *args, **kwargs):super(ResultCallback, self).__init__(*args, **kwargs)self.host_ok = {}self.host_unreachable = {}self.host_failed = {}def v2_runner_on_unreachable(self, result):super(ResultCallback, self).v2_runner_on_unreachable(result)print(json.dumps({result._host.name: result._result}, indent=4))def v2_runner_on_ok(self, result, **kwargs):super(ResultCallback, self).v2_runner_on_ok(result)print(json.dumps({result._host.name: result._result}, indent=4))def v2_runner_on_failed(self, result, *args, **kwargs):super(ResultCallback, self).v2_runner_on_failed(result)print(json.dumps({result._host.name: result._result}, indent=4))def main():loader = DataLoader()inventory = InventoryManager(loader=loader, sources='./inventory/hosts.yml')variable_manager = VariableManager(loader=loader, inventory=inventory)playbook_path = './project/playbook.yml'if not os.path.exists(playbook_path):print('[INFO] The playbook does not exist')sys.exit()passwords = {}context.CLIARGS = ImmutableDict(connection='smart', module_path=['/to/mymodules', '/usr/share/ansible'], forks=10, become=None,become_method=None, become_user=None, check=False, diff=False, verbosity=0,syntax=False,start_at_task=None)executor = PlaybookExecutor(playbooks=[playbook_path],inventory=inventory,variable_manager=variable_manager,loader=loader,# options=options,passwords=passwords)results_callback = ResultCallback()executor._tqm._stdout_callback = results_callbackresults = executor.run()if __name__ == '__main__':main()
PlaybookExecutorwを使う
下記を参考にさせて頂きました
実行前確認
プログラムの実行前にtargetnodeに
httpdがないことを確認する
$ docker exec -it targetnode bash[root@368db8ee502a /]# systemctl status httpdUnit httpd.service could not be found.[root@368db8ee502a /]#
targetnodeではhttpd.serviceがないことを確認する。
main_readfile.pyを実行する
ファイルがないことを確認できたので
main_readfile.pyを実行する
※右上の実行ボタンを押す
root@baadc5f2b5b6:/workspaces/ansible_pythonAPI# /usr/local/bin/python /workspaces/ansible_pythonAPI/app/main_readfile.py{"target": {"ansible_facts": {"discovered_interpreter_python": "/usr/libexec/platform-python"},"msg": "","changed": true,"results": ["Installed: apr-util-1.6.1-6.el8_8.1.x86_64","Installed: mailcap-2.1.48-3.el8.noarch","Installed: apr-util-bdb-1.6.1-6.el8_8.1.x86_64","Installed: brotli-1.0.6-3.el8.x86_64","Installed: apr-util-openssl-1.6.1-6.el8_8.1.x86_64","Installed: httpd-2.4.37-56.module+el8.8.0+1284+07ef499e.6.x86_64","Installed: mod_http2-1.15.7-8.module+el8.8.0+1284+07ef499e.3.x86_64","Installed: httpd-filesystem-2.4.37-56.module+el8.8.0+1284+07ef499e.6.noarch","Installed: httpd-tools-2.4.37-56.module+el8.8.0+1284+07ef499e.6.x86_64","Installed: rocky-logos-httpd-86.3-1.el8.noarch","Installed: apr-1.6.3-12.el8.x86_64"],"rc": 0,"invocation": {"module_args": {"name": ["httpd"],"state": "latest","allow_downgrade": false,"autoremove": false,"bugfix": false,"disable_gpg_check": false,"disable_plugin": [],"disablerepo": [],"download_only": false,"enable_plugin": [],"enablerepo": [],"exclude": [],"installroot": "/","install_repoquery": true,"install_weak_deps": true,"security": false,"skip_broken": false,"update_cache": false,"update_only": false,"validate_certs": true,"lock_timeout": 30,"allowerasing": false,"conf_file": null,"disable_excludes": null,"download_dir": null,"list": null,"releasever": null}},"_ansible_no_log": false}}
Ansibleが実行されたので、targetnodeにログインして
httpdがインストールできているか確認する。
$ docker exec -it targetnode bash[root@368db8ee502a /]# systemctl status httpd● httpd.service - The Apache HTTP ServerLoaded: loaded (/usr/lib/systemd/system/httpd.service; disabled; vendor preset: disabled)Active: inactive (dead)Docs: man:httpd.service(8)
httpdがインストールされていることを確認する
まとめ
DockerとVScodeを使ってAnsibleをPythonから実行する方法を
簡単に試してみた。
Ansibleに関してはまだまだ知らないことが多いので
色々と試していきたい。


