当サイトは、アフィリエイト広告を利用しています
【Gatsby × contentful】MDX記事内の画像を左寄せにする方法
作成日:2023月08月24日
更新日:2023年12月27日


当ブログでは記事内の画像はcontentfulにある記事内で設定している。
その画像はgatsby-remark-images-contentfulを使ってGatsbyで
表示させているのだが、画像が中央になってしまうので左寄せにする方法をまとめる。
こんな感じで中央寄りになり見栄えがよろしくない

wrapperStyleが効かない
gatsby-remark-images-contentfulのオプションでは「wrapperStyle」があり
画像に対して、cssを設定することができるがデフォルトである設定と重複していた
場合はデフォルトの設定が優先されてしまうようだ。
wrapperStyleを設定してみるが...
gatsby-config.jsでwrapperStyleを設定してみる
gatsby-config.js
~{resolve: `gatsby-remark-images-contentful`,// resolve: `gatsby-remark-images`,options: {// It's important to specify the maxWidth (in pixels) of// the content container as this plugin uses this as the// base for generating different widths of each image.maxWidth: 900,withWebp: true,wrapperStyle: `border: 5px solid red; margin-left: 0!important;margin-bottom: 10px;`,},},~
margin系のcss設定をカスタマイズする
デフォルトの設定があるものはwrapperStyleの設定が効かない
画面は下記のような感じになる。
margin-left: 0!importantが効いていないように見える。
F12でさらに見てみると
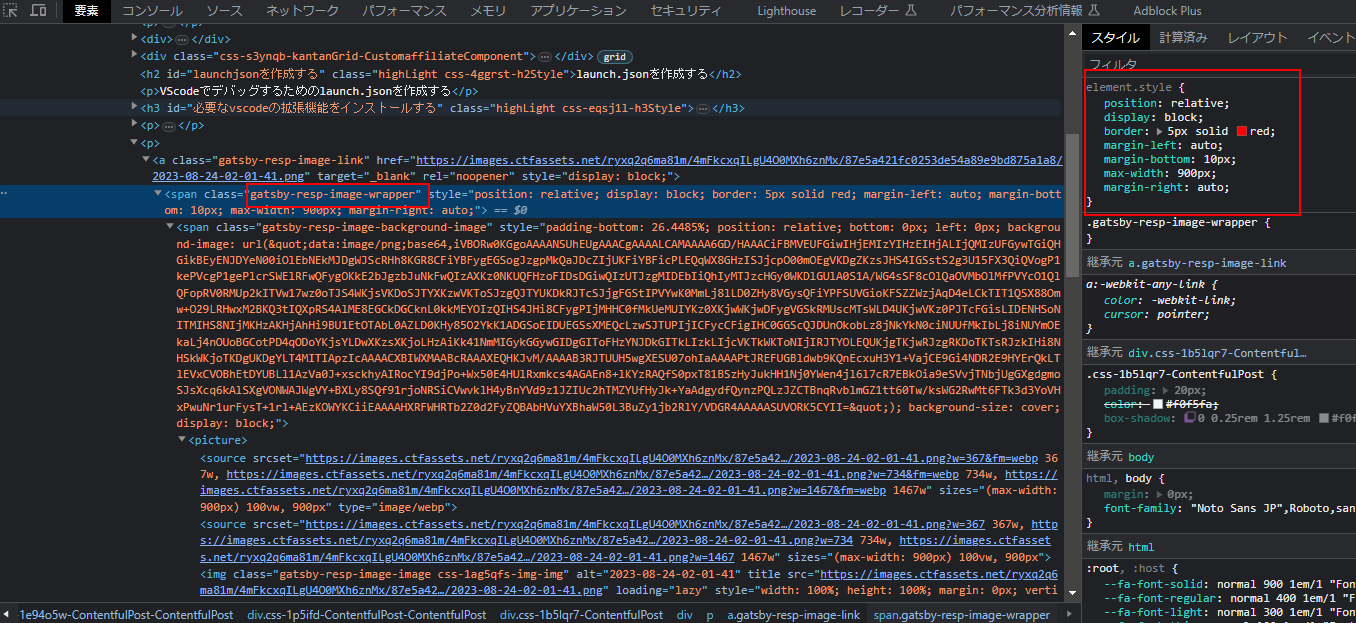
- border: 5px solid red
- margin-bottom: 10px
のみが設定されており、 margin-leftはautoにされてしまっている。
どうやらデフォルトのcssとwrapperStyleでカスタマイズしたcssが
重複した場合はデフォルトのほうが優先されるようだ。
※重複していない場合はカスタマイズの設定が効く。
画像を何とか左寄せにする
とはいえ中央よりだとちょっと見栄えが気にくわないので
何とか左寄せにする。
グローバルCSSを設定して左寄せを強制する!!
当サイトはEmotionでスタイリングをしており、cssは使ってないのだが
やむを得ないのでcssで設定する。
CSSファイルを作る
プロジェクト直下にCSSファイルを作り、
画像のスタイルを設定しているクラスと同名のクラスを定義する。
css
.gatsby-resp-image-wrapper {margin-left: 0 !important;}
中身は左寄せにするためmargin-leftを設定
gatsby-browser.js
作成したCSSファイルグローバルに読み込ませたいため
gatsby-browser.jsで読み込む
※gatsby-browser.jsがない場合はプロジェクト直下に作成する
gatsby-browser.js
import "./styles.css";~
gatsby-ssr.js
gatsby-browser.jsとgatsby-ssr.jsは同じ実装をする必要があるため
gatsby-browser.jsと同様に書く。
※ない場合はこちらも作成
gatsby-browser.jsやgatsby-ssr.jsについては下記記事でまとめています


再度画面を表示してみる
gatsby-config.jsでwrapperStyleを変更する
gatsby-config.js
~{resolve: `gatsby-remark-images-contentful`,// resolve: `gatsby-remark-images`,options: {// It's important to specify the maxWidth (in pixels) of// the content container as this plugin uses this as the// base for generating different widths of each image.maxWidth: 900,withWebp: true,wrapperStyle: `margin-bottom: 10px;`,},},~
margin-bottomだけ設定する。
gatsby-config.jsを変更しているので再度、「gatsby develop」で
を実行し、画面を再表示する
画像が左寄せになっている。
参考
新着記事


top